
Equipment
Amateurs Take on The Old Course’s Back 9
So with the help of Shot Scope, you’ve tackled the (easier) front 9 at the Old Course. You overcame your first tee shot nerves, avoided the Shell bunker, and birdied the 9th. But now it’s time to gear up and take on the harder, back 9.
Fortunately, Shot Scope has helped you prep for the round by demonstrating you were amateurs of all skill levels thrive (and stumble):
View this post on Instagram
Hole No. 11 — Par 3, 164 Yards; Avg. Score = 3.76 (Rank = 6)
So after navigating the Par-4 10th, you’ve arrived at the second (and last) Par-3 on the Old Course. Unfortunately, the 11th hole has also been described by many as the “shortest par-5 in golf.”

Scoring average for amateurs is 3.2 when the tee shot lands on the double green that is shared by the 7th and 11th holes. Missing the green—which happens 59% of the time—basically adds another stroke, with shots missing left averaging a 4.4, missing right averaging 3.9, missing short averaging 4.1, and missing long averaging 4.0. Those misses, however, pale in comparison to the damage a miss in the small, front right bunker. While only 13% of tee shots find their way into this small bunker, only 15% get up and down while 55% make bogey and 30% make double (or worse).
Unfortunately, getting on the green is just the first half of the job. Indeed, the average tee shot proximity to the pin is 73 feet, while the average second shot from off the green rarely finds its way inside 20 feet from the pin. Add in a severe back-to-front slope, and you can see why No. 11 is more about reducing damage exposure.
Hole No. 12 — Par 4, 304 Yards; Avg. Score = 4.51 (Rank = 14)
After grinding your way through No. 11, No. 12 forces you to continue the fight. Originally designed to be played in reverse, the 12th fairway is littered with hidden bunkers that are blind from the tee box. And as is becoming a theme, finding one of these costs on average at least 1/2 a shot.
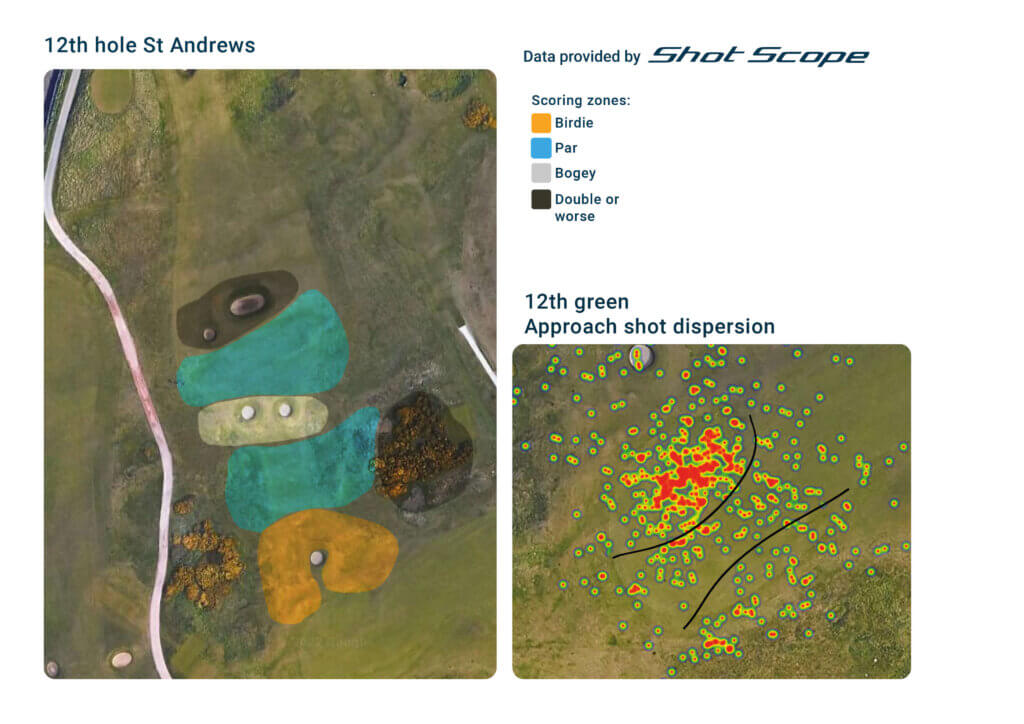
Unsurprisingly, the first bunker is also the most penalizing and is the frequent source of double bogeys. Naturally, the blind fairway bunkers are compounded by gorse bushes on the right that also routinely led to double bogeys.
The approach shot isn’t much easier than the blind tee shot due to the back tier of the green (indicated by the black lines). Fortunately, missing short is not as penalizing as missing long, where golfers only get up and down 17% of the time (which is probably much lower when the pin is tucked on the back of the green).
Hole No. 14 — Par 5, 523 Yards; Avg. Score = 5.95 (Rank = 11)
Welcome to Hell! The 14th is the site of the famous Hell Bunker, which covers a total ~300 square yards and is nearly 7 feet deep.
View this post on Instagram
The Hell Bunker is also where Jack Nicklaus infamously carded a 10 in 1995.
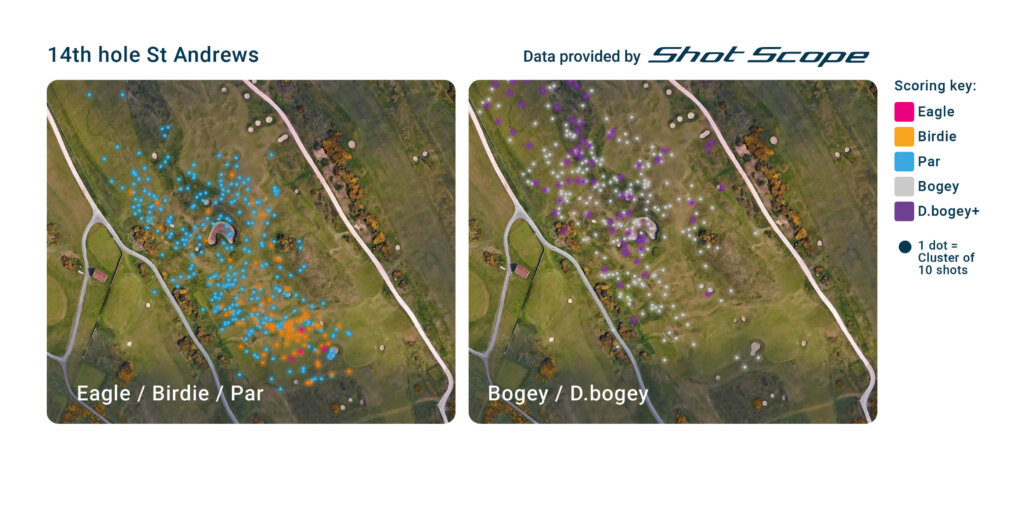
The trick to 14 is your second shot, which is always much more difficult when playing links golf. Golfers—mostly consisting of 10 handicappers or better—who carry Hell set themselves up for par and, if you’re lucky, birdie. Unfortunately, golfers—primarily 10 or higher handicap amateurs—who get stuck behind (or in) Hell really make things very difficult for themselves, as the heat map shows a substantial majority of bogey and double bogey shots come from here.
That doesn’t, however, mean you need to play Bryson golf to overcome 14. Indeed, only 34% of golfers reach the green in 2 shots, so the goal here is clearly two green shots that give you a good look at the green with a wedge in your hand.
Hole No. 17 — Par 4, 436 Yards; Avg. Score = 5.31 (Rank = 1)
Despite being ranked the 5th hardest hole on the Old Course, the famous Road Hole is, statistically, the hardest hole on the course. Just ask Mike!
View this post on Instagram
The simple fact is there are plenty of obstacles that can throw a wrench into how you play No. 17. From the tee, plenty of pressure is put on amateurs to execute the perfect tee shot by cutting over the Old Course Hotel. Unfortunately, 45% of amateurs play the shot too far to the left and find themselves in the left-side rough or, in worse cases, the 2nd fairway. In the case of the latter, 100% of tee shots finding the 2nd fairway result in bogey, double bogey, or worse. To sum things up, the key to No. 17 is being as aggressive off the tee and executing the shot.
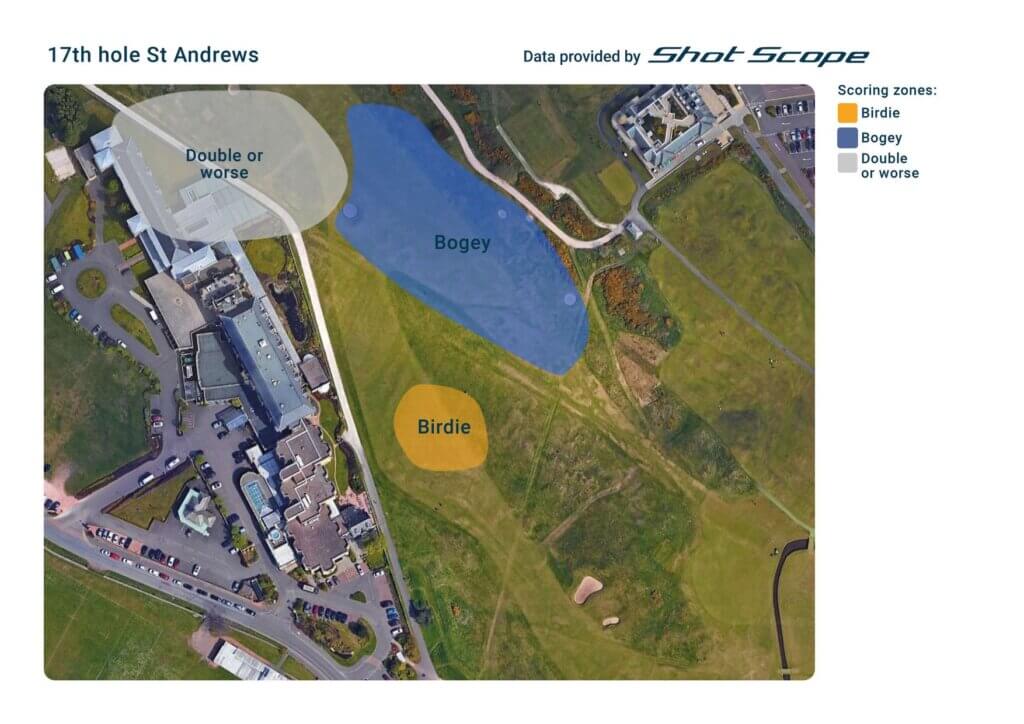
And that leaves the Road Hole bunker.
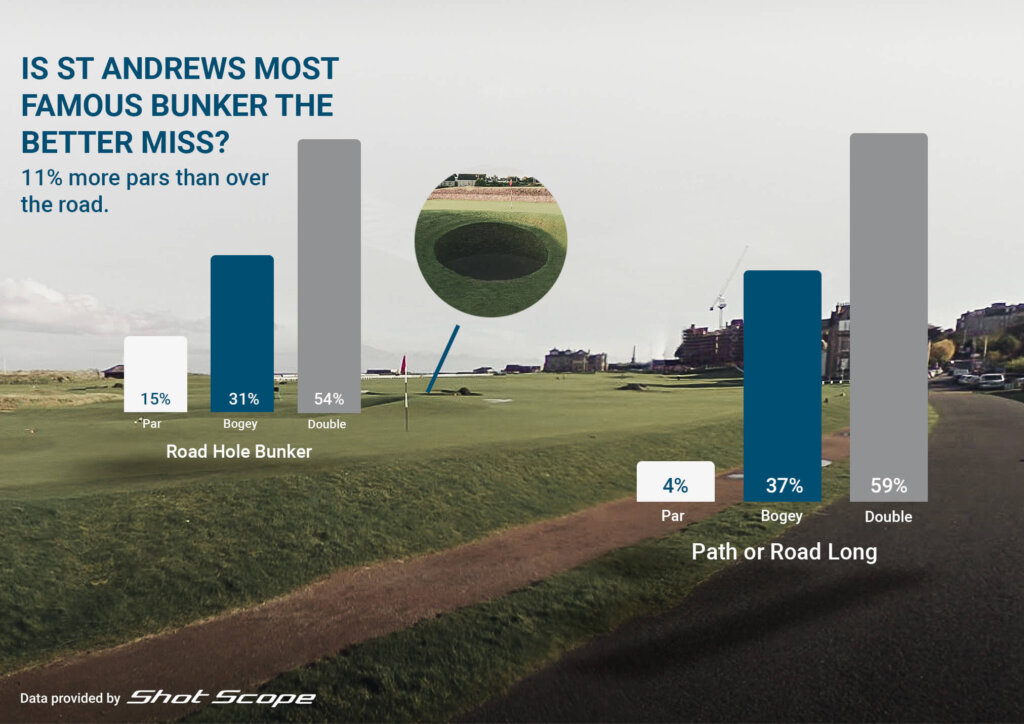
For those unaware, all paths and roads are integral parts of the Old Course and, therefore, the ball must be played as it lies. So the obvious question becomes whether it’s better to miss short and, potentially, in the bunker or miss long and bring the path and road into play.
Statistically speaking, avoid both hazards, but if you have to bring one into play, the bunker—despite only 15% of golfers getting up and down from it—is more friendly than the path or road.
Hole No. 18 — Par 4, 361 Yards; Avg. Score = 4.34 (Rank = 16)
Perhaps one of the most well-known closing holes in golf. The walk over Swilken Bridge and, for the bombers, the chance to drive the green in front of the crowd and The Royal and Ancient Golf Club—an accomplishment that can even bring a smile to Rory McIlroy’s face.
Fortunately, the 18th hole is the 3rd easiest hole on the Old Course and provides a great opportunity to end your round with a birdie. Despite the fairway being over 100 yards wide and, thus, resulting in a 96% chance of finding it, to score well on the 18 shares a lot with what 17 just demanded from you: a great drive.
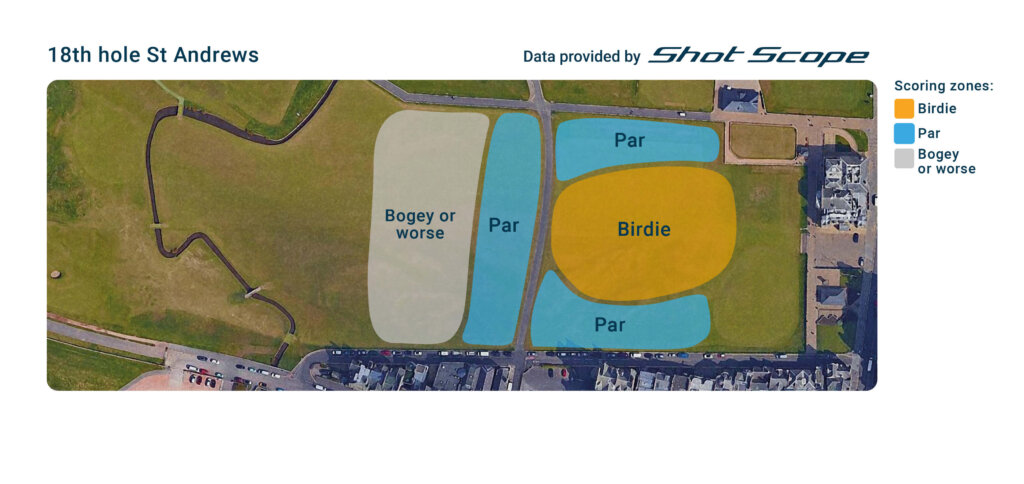
Shot Scope data shows that a substantial percentage of birdies (71%) and pars (67%) come from tee shots that made it over the road. At around 230-250 yards to the road depending on which tees you are playing from, an above average is required. And if you can add a little precision to your tee shot, balls that favor the left side of the fairway are seen to score better than those hugging the out-of-bounds right.
In the event you don’t drive the green, the Old Course has one last trap to punish you with: the Valley of Sin, a green depression located at the immediate front of the 18th green. But the ominous name might be the most threatening part of this hazard, as data shows that even if you feel the need to torment yourself one last time before walking off the Old Course, you have a 43% chance of getting up and down.
View this post on Instagram
With the help of Shot Scope, you now have a much better understanding of all the Old Course’s nuances that make it so unique but challenging. Hopefully one day you’ll be able to tee it up at the famous course, but even if you don’t, at least this information will provide you with a newfound appreciation of the Open Championship this weekend when the pros succeed (and fail) while taking on each of its obstacles.
Cover Image Via ShotScope

Is LIV Set to Make More Big Changes to Survive?

Best Golf Gifts for Dad: Father’s Day Gift Guide 2026
Another Major PGA TOUR Schedule Shakeup
 | Save with the GOLFICITY Discount")
Lagoon Sleep Coupon Code (2026) | Save with the GOLFICITY Discount

7 Underrated Tips to Get the Most Out of Your Next Golf Trip

2026 PGA Championship Picks & Preview

Titleist Introduces New GTS Drivers: More Speed, More Stability, and More Adjustability
Another Major PGA TOUR Schedule Shakeup
7 Underrated Tips to Get the Most Out of Your Next Golf Trip
Is LIV Set to Make More Big Changes to Survive?

We Played This Old Golf Course Where Thomas Edison Was A Member

Are You MEASURING Your Golf Swing Correctly? (This Can Help)

Zach Johnson Explains Why He Didn’t Pick Bryson DeChambeau for the Ryder Cup

Justin Thomas FIRES Coach before Ryder Cup…Who’s Next?


